
How many times have you looked for some specific product and found yourself stuck in the immeasurable online world, where everything is there for you and around you, but that one thing…? It’s missing.
Searching for anything specific in a crowded online marketplace can be overwhelming. This is where niche directories step in to save the day. Such directories offer a focused and unique online experience, connecting users with specific products and services within a particular niche.
In this article, we’ll show you how to create a niche directory website using WordPress.
Let’s get started!
Benefits of Niche Websites
Let’s look at some key benefits of niche directories over general ones:
- More targeted audience – niche directories attract users who are specifically interested in a particular niche or industry. This ensures that your directory connects with a highly relevant and engaged audience.
- Unique offerings – unlike general directories that cover a wide range of categories, niche directories focus on specific products, services, or topics.
- Enhanced user experience – by narrowing down the options, niche directories provide a more streamlined and focused user experience, making it easier and faster for users to find what they’re seeking.
- Increased engagement – the targeted nature of niche directories often leads to higher engagement levels as users are more likely to explore and interact with listings that match their interests and requirements.
- Competitive advantage – niche directories establish themselves as authoritative platforms within their specific niches, gaining credibility among users and becoming go-to resources for relevant products and services.
- Higher conversion rates – with a more targeted audience and specialized offerings, niche directories have the potential to generate higher conversion rates.
As you see, by focusing on a specific niche, you can strongly differentiate your directory and, possibly in the future, establish it as the first resource that comes to mind within that niche.
Prerequisites for a Niche Directory Website
So, in order to bring your niche directory website to life, you will need:
- Hosting plan
- Domain name
- WordPress installation
- Directory plugin
- Directory theme
While finding a hosting provider, choosing a domain name and installing WordPress are pretty easy tasks, choosing a reliable directory plugin may be a tough deal. To make it easier, you can check this list of popular WordPress directory plugins and choose one that suits your needs.
For the sake of this tutorial, we’ll use HivePress, a free directory plugin, and its ListingHive theme since they are both free, easy to use, and highly customizable.
So, let’s move to the tutorial part!
Steps to Create a Niche Directory Website
Here are a few steps that allow you to build a directory website with WordPress. Let’s start with the theme installation.
Installing HivePress & ListingHive
Firstly, install the ListingHive theme. You can do this directly from the WordPress Dashboard. Go to the Appearance > Themes page, click on Add New and search for ListingHive, and then Install and Activate it.
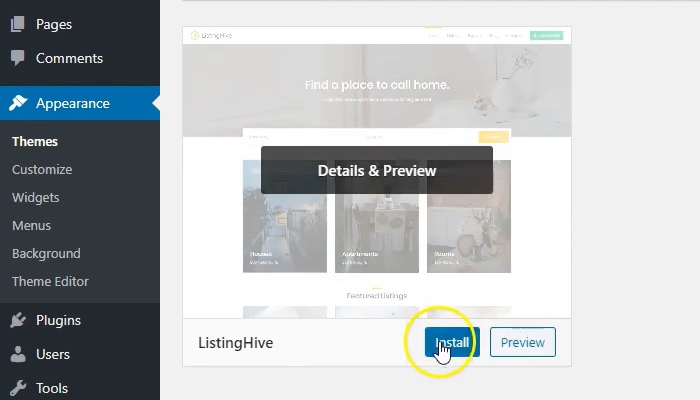
Once you activate the theme, you’ll be prompted to install the HivePress plugin. Follow the link and proceed with the installation. After installing, click on the return link and activate HivePress.
Adding Listing Categories
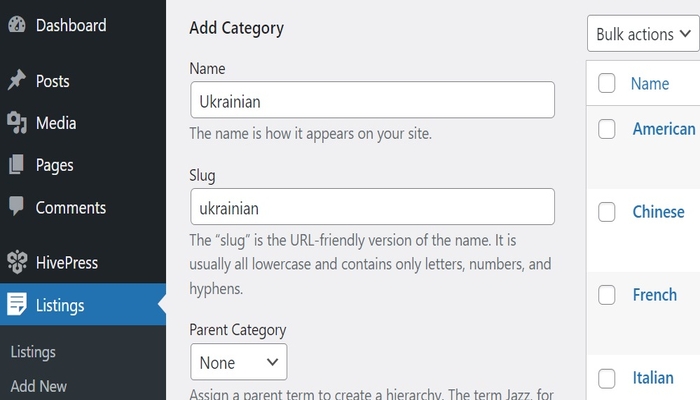
Next, you need to add listing categories to your niche directory to make it easier for users to browse listings. For the sake of this tutorial, let’s imagine you’re creating a restaurant directory. Thus, you might outline some cuisine types. To do this, navigate to the Listings > Categories section. Then specify the category name, fill in the description field if necessary, and upload the category image. Finally, click the Add Category button.
In the same way, you can add as many categories as you need. Moreover, you can create subcategories by selecting a parent category from the ones you have already added.
Adding Custom Listing Fields
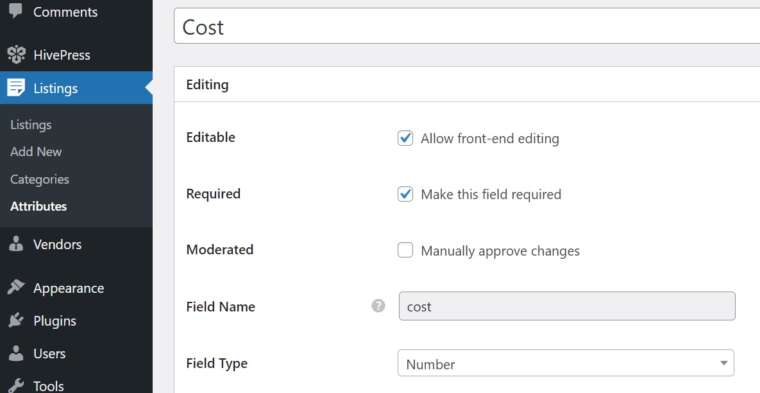
Once you finish with categories, you’ll need some listing fields. Head to the Listings > Attributes section, click the Add New button and fill in the fields depending on the type of attribute you’re adding. For example, let’s add a common “Cost” attribute.
To do this, in the Editing section, you need to set the custom field name and allow its front-end editing so users can fill in this field when adding new listings. We’ll also make this field required and choose the “Number” field type.
In the Search section, you adjust the attribute search settings. For our “Cost” example, we need to mark this attribute as “Sortable” and “Filterable” to let users find prices that correspond to their budget.
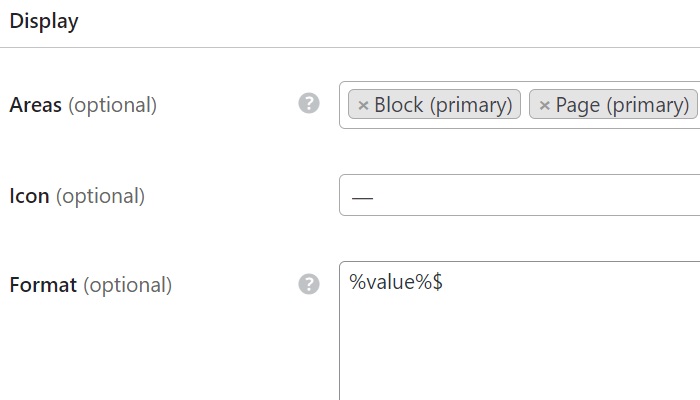
Display defines how the attribute appears on the listing pages. We’ll set a displaying area to Block (primary) and Page (primary). And for this attribute, let’s put a %value% format with an added currency symbol. Move your cursor on the question mark symbol to see all available tokens.
In the same way, you can add as many attributes as you need.
Adding Pages and Customizing Your Website
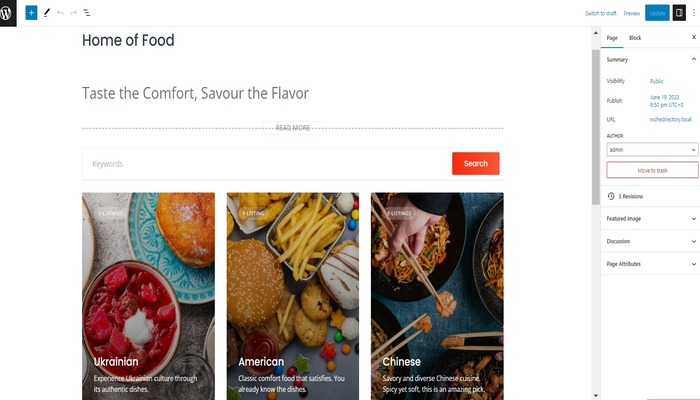
Now, you need to add a homepage for your directory website. Creating and editing one is pretty easy because HivePress is integrated with the WordPress block editor. Go to the Pages section in the Dashboard and click the “Add New” button.
Next, fill in the page title (e.g., “Home”) and start adding the layout blocks. Simply click on the “Plus” icon and select the block. For example, you can add the Listing Search form, Categories block, Recent Listings block, etc. Once you’re finished with the layout blocks, click on the “Publish” button. Then navigate to the Dashboard > Settings > Reading section and set this newly created page as the homepage.
It’s also possible to customize the look and feel of your site by visiting it from Dashboard and clicking the “Customize” button. Here you can change the site’s logo and icon, name and tagline, adjust colors to your liking, set a header image, choose fonts, add site menus, widgets, and so on. Watch the tutorial video to understand the whole customization process better:
Extending Functionality
You can also enhance your website with free and premium extensions, which can be found in HivePress > Extensions. These additions will take your niche directory to the next level – whatever niche you choose, consider installing at least some. For example, the Geolocation extension provides easy location-based searches, Reviews allow visitors to rate and review listings, while Messages let users send private messages. Always keep in mind that there is constant room for improving the usability of your website.
Checking how it works
Now let’s check what we made and add a new listing from the front-end to see how it works for users. Visit your site and click “Add listing” – now you can see all the previously added attributes. Fill them in, pick a category, add an image, and write a title.
Return to the Listings section in your Dashboard and approve the newly suggested listing. You can also turn off the manual approval in Dashboard > HivePress > Settings > Listings. Many other settings are there, too, so spare some time to go through them all.
Monetization
Last but not least, let’s discuss revenue generation and monetization strategies for your niche directory. It’s important to note that generating revenue requires significant website traffic. Therefore, focus on enhancing user experience and providing high-quality content to build credibility and attract a wide audience. Once you’ve achieved these goals, you can explore some popular monetization options for your directory:
- Charge users for adding listings – this method works best if your site has niche listings. You can create different listing packages with the Paid Listings extension in HivePress. Limit submissions, assign packages to specific categories, and generate revenue while providing businesses a platform to showcase their offerings.
- You can also monetize your directory by allowing businesses to promote their offerings for a fee. With the Paid Listings extension, listings can be marked as featured, giving them a prime placement in search results.
- Let businesses take control of their listings with the option to claim them on your niche directory. For example, you can list enterprises by yourself and then get in touch with their owners and offer to claim the listings – the owners will get the opportunity to manage their information, engage with customers, and stay up-to-date with statistics and reviews. This monetization model generates revenue and also ensures that accurate and relevant information is always displayed on your website. If you use HivePress, this method can be realized with the Claim Listings extension.
- Lastly, you can simply sell advertising space. This can be done by integrating the ads platform like Google AdSense or by contacting advertisers directly to display ad banners on your website. However, be mindful of maintaining a positive user experience and avoiding excessive ads that could impact visitor engagement. Balancing revenue generation with user satisfaction is key.
Few words about marketing
Once your niche directory website is up and running, it’s essential to implement effective marketing strategies to attract visitors and grow your audience. Grab a few tips that’ll help you get started:
- Create an informative and engaging blog related to your niche, which would drive organic traffic to your website.
- Set up Google Analytics on your website to gain valuable insights into your visitors’ behavior, traffic sources, and engagement.
- Run an advertising campaign using Google Ads or social media – targeted ads might help you attract users.
- Following the previous hint about social media – create social profiles in order to engage with your audience and encourage user reviews.
Remember, marketing is an ongoing effort. Don’t forget to monitor the effectiveness of your marketing efforts, tweak your strategies as needed, and adapt to changing trends and user preferences.
Wrapping up
So, in a world where time is precious and finding the right thing at the right moment is paramount, niche directories, with their approach, provide an invaluable solution. They offer an experience that saves users from the overwhelming maze of generic directories.
Now you know: by implementing the power of WordPress with its plugins and themes, you can create a directory that meets the needs of your target audience perfectly and delivers a fantastic user experience, making you the happiest creator of that exact website. Consistency, quality, and a targeted approach will help your small niche directory thrive in a competitive online landscape. The perfect time to start is now!