
Ready to make a website? In this step-by-step guide we will talk about all your options, and how you can easily create your website with no coding skills required.
Let’s start from the very basic thing. What is website? In simple terms, a website is a collection of pages placed on a web server and organized typically under the same domain name.
And today we will be talking about the process of building a website.
Generally speaking, there are 2 ways to build a good professional website. The first way is to code it yourself using modern coding languages. Obviously, this way requires plenty of time, efforts, skills and knowledge.
The second way is to use existent site builder, framework, content management system, etc. If you choose this way, your site development will be much easier and more pleasant. And we strongly recommend choosing this way.
Moreover, even you can hire a website developer which can make it super easy and efficient.
Best Content Management Systems & Site Builders
There are multiple content management systems (CMSs) and site builders on the market for modern website. The most popular ones are WordPress, Joomla, Drupal, Shopify, Squarespace, Wix, etc.
Below is the market share of each platform. Gray bar is a share among all sites in the net. And green bar is a share among CMS systems.
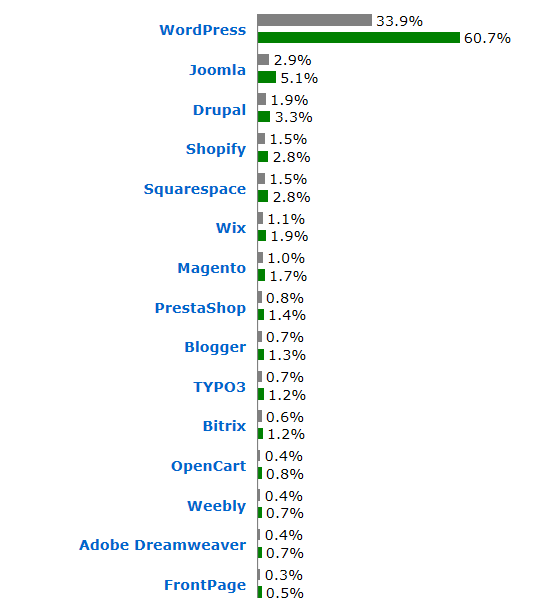
As you can see the vast majority of all sites are made with WordPress CMS. And its market share is growing each month.
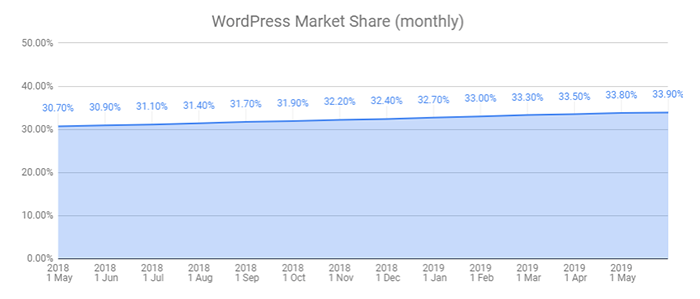
The reason of such an amazing growth is that this CMS has a very strong community. It develops plenty of free plugins and widgets. Most of WordPress contributors are open to give a hand to beginners.
Moreover, the engine is constantly supported and a user can update it with 1 click. Above all, it was made to be understandable and manageable by both newbie and professional developer.
So, if you want to build a website and not sure which platform to choose, we strongly recommend using WordPress.
Let’s proceed with the specific steps to create your site.
Step 1. Choose Your Site Domain Name
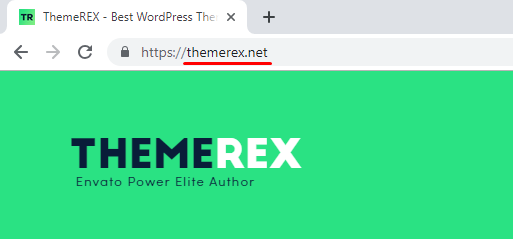
Domain name is a unique name of your website. Also, it is a web address where internet users can find your site. For example, our domain name is themerex.net. You can find it in a browser search field.
It is crucial to choose a correct domain name. It influences your eCommerce SEO, reputation and brand memorability.
Ecommerce SEO agencies can assist in selecting a domain name that aligns with SEO best practices and enhances your brand’s visibility. With their expertise, they ensure your domain supports search rankings, is memorable for customers, and reflects your brand’s identity effectively.
Here are some general recommendations for picking a domain name.
- Pick a branded name over the general one. In long term prospective it is always better to associate your domain name with your brand rather than using general keywords. For example, if one owns a pizzeria “Sanchos”, it is better to go with something like sanchos.com than pizzeria.com.
- It should be easy to spell & read. Don’t make your domain name too long or too complicated to read/remember. Your customers shouldn’t have any problems typing your site name and access your web page.
- Pick .com over .org or .info. Intuitively web users want to go to .com websites. This extension is much more popular and easy to type, read and remember.
- Avoid numbers, underscores and dashes if it’s possible. Don’t give your customers a chance to make a mistake. Try to use only letters.
- Make sure your domain name is available. There is a chance that the domain name you pick is already used by other site. Therefore, you need to check it first. Luckily, there are plenty of free tools available online.
In fact, this process is not that easy as it seems to be. Therefore, we’ve prepared a step-by-step guide how to choose the domain name correctly.
Step 2. Choose a Web Hosting Provider
Web hosting companies provide a space on their web servers and data centers, where site owners can place their websites. They make sure your site is loading well and constantly accessible through the web.
Also, good hosting providers give convenient tools to facilitate your work over the website. Hence, it’s extremely important to choose a good hoster.
Here are some main qualities of good modern hosting provider.
- Security. You want your site to be in a safe place.
- Speed. Your visitors shouldn’t wait too long while your site is loading.
- Uptime. Hosting company has to make sure your site is always up and running, no matter whether they have any difficulties with their software or hardware.
- Support. In case you have any questions or difficulties, the hoster has to be ready to assist you.
- Services. The company has to be ready to provide you with any kind of web hosting related services, even if you don’t need them right now.
- Price. Nobody wants to pay more, if it is cheaper somewhere else.
We are 10+ years in web design and development. We had a chance to work with dozens if not hundreds of different hosting providers. So, we came up with a list of TOP 3 web hosting companies in the world for modern website:
We strongly recommend using one of these 3 hosting providers for your future website.
And here is the detailed guide how to choose the best web hosting provider.
Step 3. Create an Account and Install WordPress
So, we already picked our platform (WordPress), chose our site domain name and the web hosting provider. Our personal pick is BlueHost. We’ve been partners with them for a long time, and our site visitors now have 50% discount with them.
Let’s see how to create an account with this hosting provider.
First, get our discount by visiting our BlueHost Promo-Page.
Then, click on “Get Started Now” button.
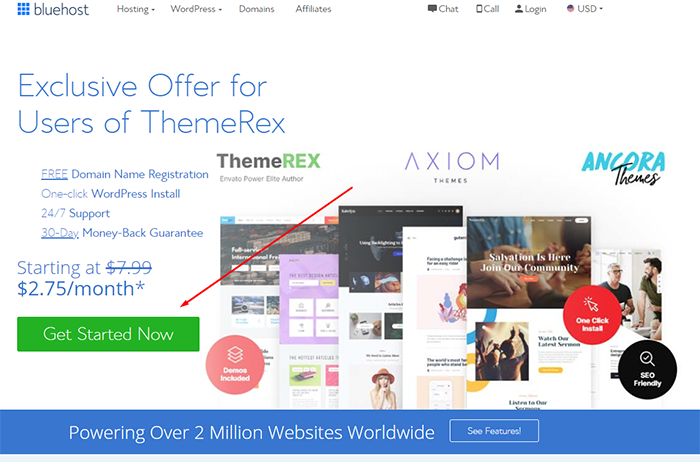
On the next screen you can choose a suitable hosting plan, considering main features and prices.
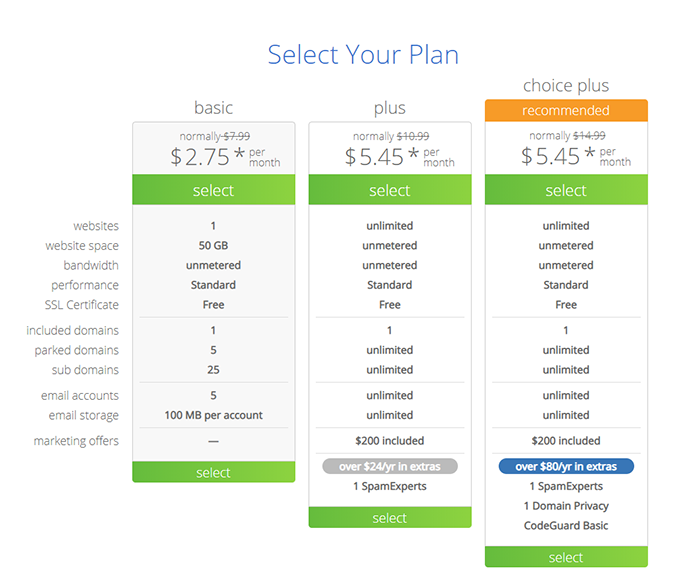
Once the plan is selected, you will be headed to the screen where you can enter the desired domain name.
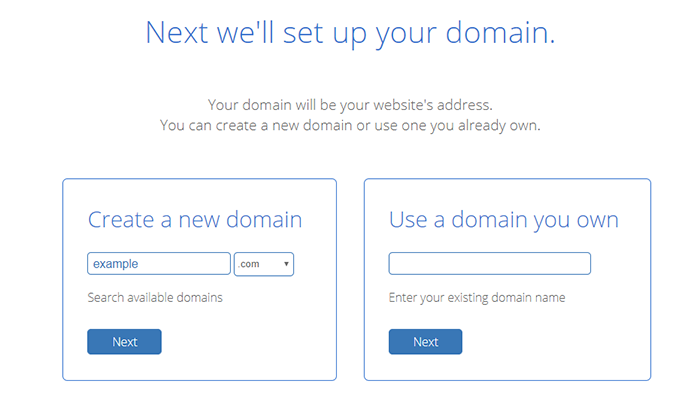
If you don’t have a domain registered yet, fill in the left field. BlueHost will register it for you. In case the domain name is unavailable, the system will worn you.
However, if you already have a domain name registered, fill in the right field and click “Next”.
Now, you will need to add your Billing information.
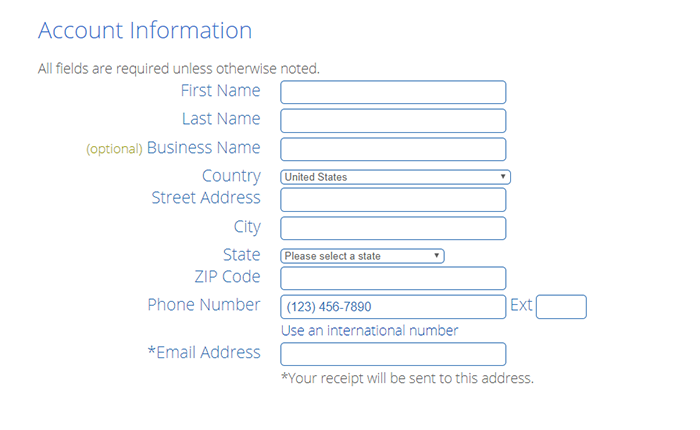
Once all the billing information is filled in and the payment processed successfully you will get an access to your BlueHost Account.
Now, let’s install WordPress on your server.
Login to your BlueHost Dashboard and navigate: My Sites -> Create Site.
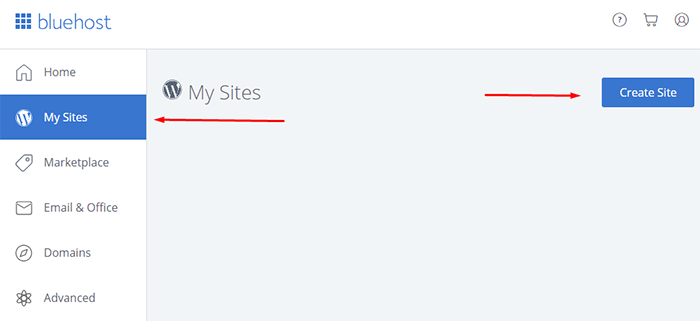
This will enable the installation wizard. Just follow the steps. First, choose the site name and tagline:
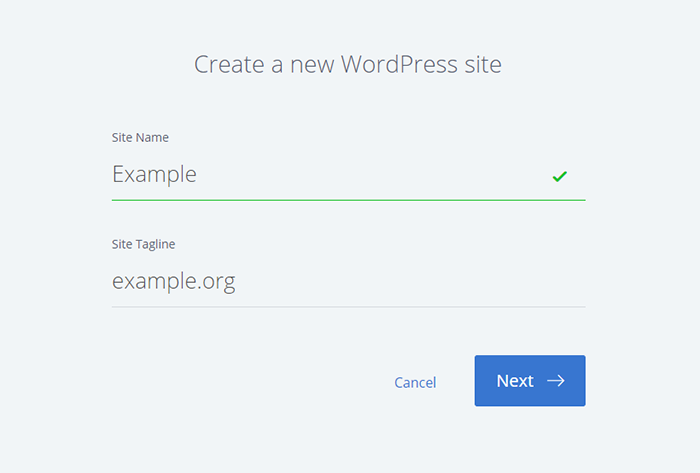
Then choose a domain and optional free plugins:
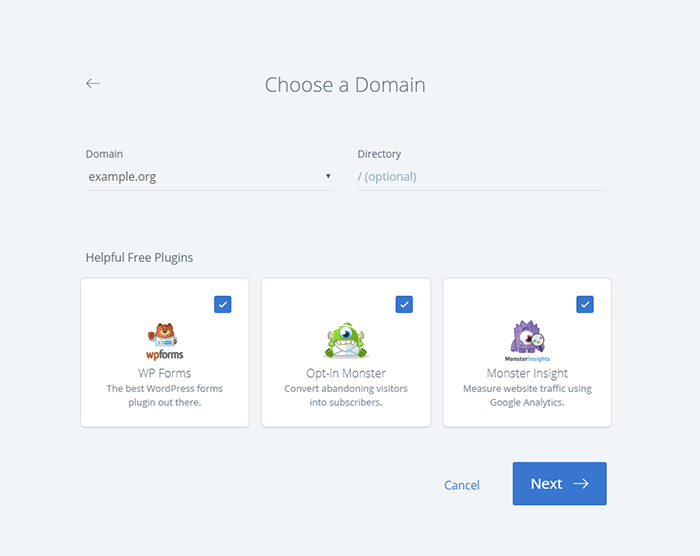
Make sure to save the access credentials.
Next, click “Go back to My Sites”:
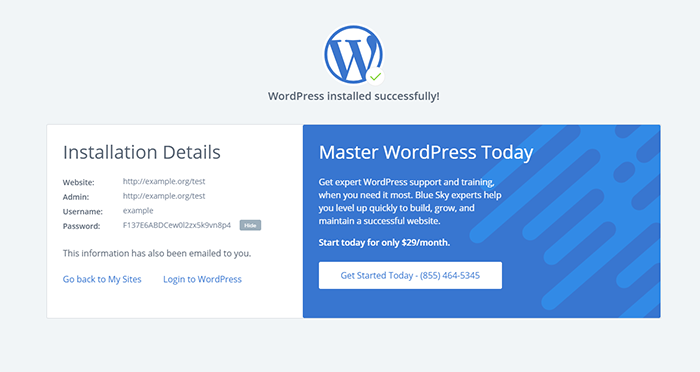
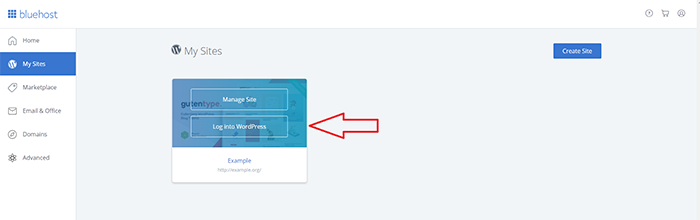
You will find your new site in your BlueHost Dashboard. Click “Log into WordPress”.
For more details and ways to install WordPress make sure to check our post on how to install WordPress correctly.
Great job! You’ve successfully installed your WordPress. Now let’s pick a good Theme for your site.
Step 4. Choose & Install WordPress Theme
WordPress Theme (or some people call it WordPress Template) is a crucial part of your future WordPress site. It defines the look of your website, ensures compatibility with required plugins and provides general site functionality. Therefore, you need to choose a high quality WP Theme.
Here are some qualities that any good WordPress template must have:
- SEO-friendly
- Crossbrowser
- Responsive
- Fast load
- User-friendly
- Gets regular updates
- Has mostly positive customer reviews
Next, think about functionality you would need. For instance, if you are looking for a charity WordPress theme, it has to have donations and events management systems. Or if you build a medical clinic site, it should be equipped with an online booking functionality.
The best places to get high quality WordPress Themes are: ThemeREX WordPress Themes and ThemeForest.
Here is also a detailed step-by-step guide How to Choose the Best WordPress Theme.
When you chose and downloaded the theme it’s time to install it into your WordPress.
Log in to your WordPress dashboard. Link to your dashboard will look like: DomainName/wp-admin. Let’s imagine your domain name is example.com. Then your dashboard link is: example.com/wp-admin.
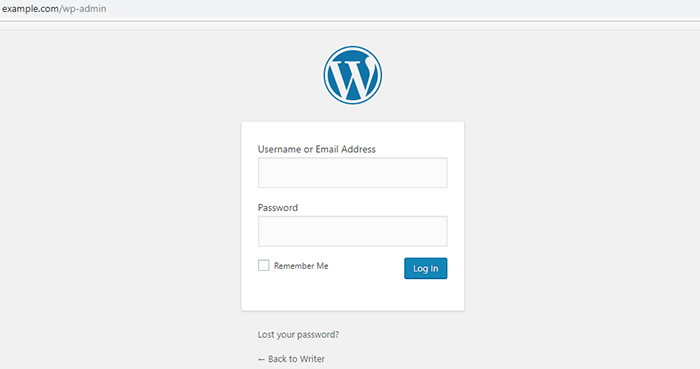
Enter your username and password.
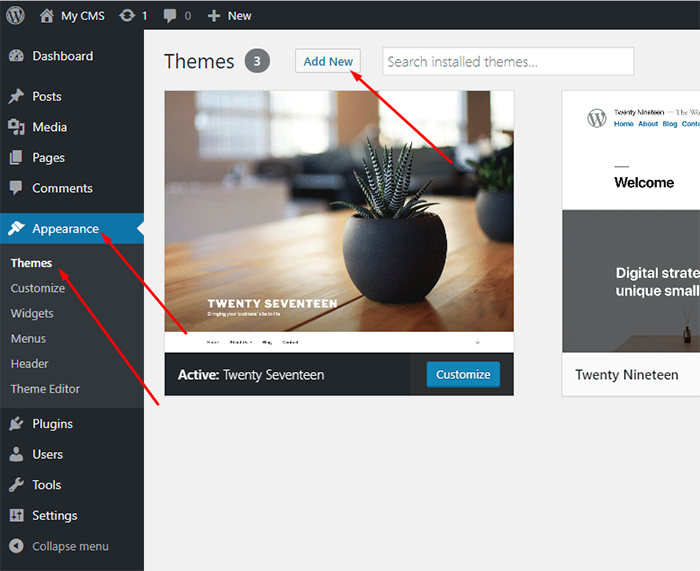
Once you are successfully logged in, navigate: Appearance – Themes and click “Add New” button.
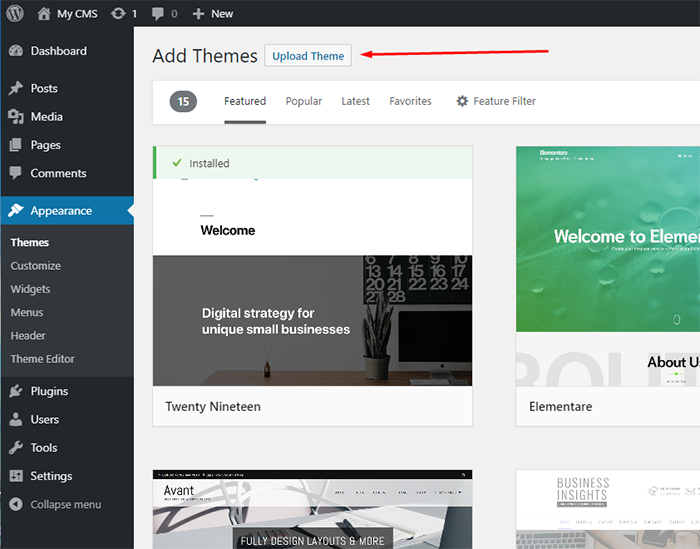
On the next screen click “Upload Theme”.
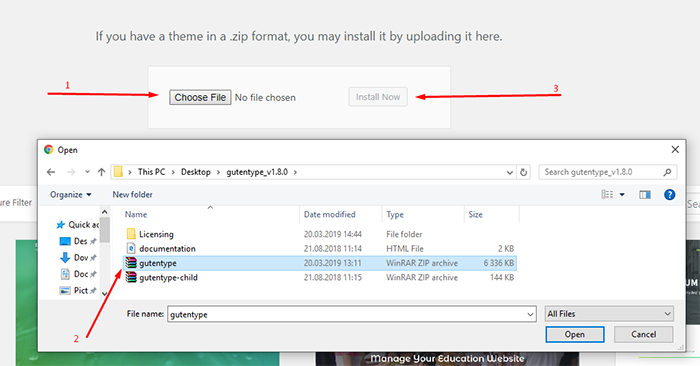
Then, just chose your theme on your PC and click “Install”.
On the next screen click “Activate”.
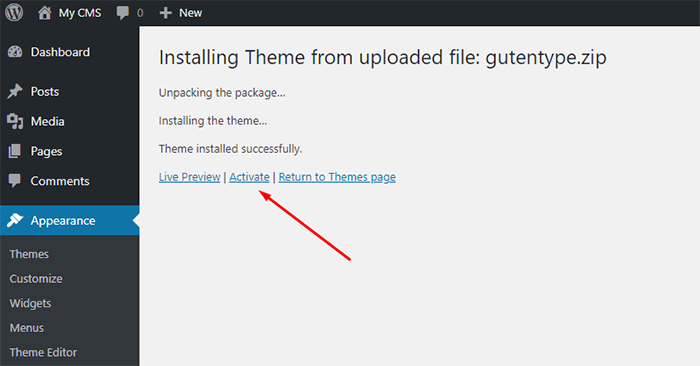
Some themes have a setup wizard that walks you through the next steps of your site development. For example:



The wizard will help you to install and activate required plugins, upload demo data and start a basic customization process.
However, if you chose the theme without a wizard, here is how you can proceed further manually.
Navigate: Plugins – Installed Plugins and click “Begin Installing Plugins”.
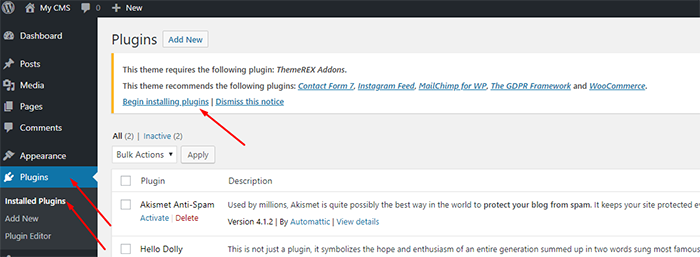
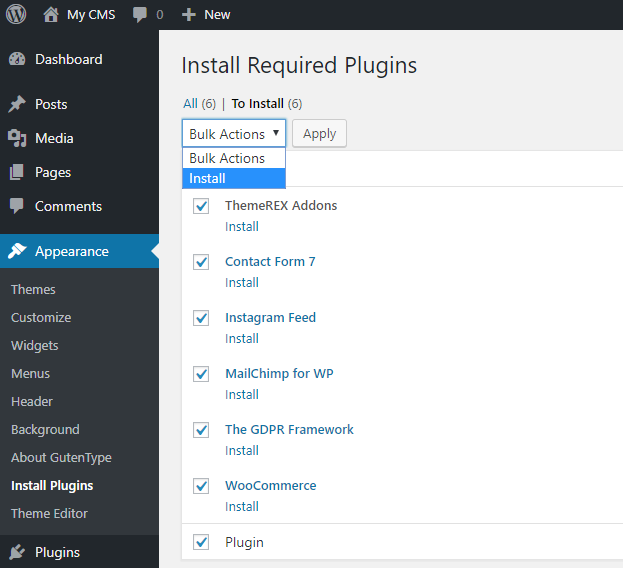
In a new window check all the plugins, choose “Install” in a Bulk Actions dropdown and click “Apply”.
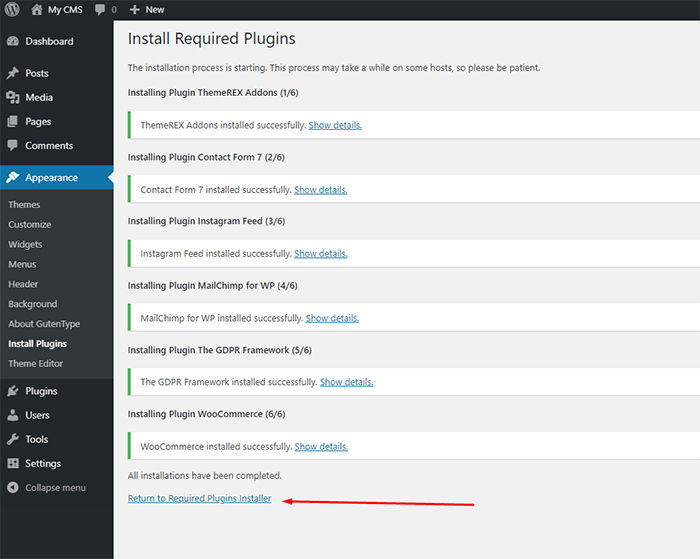
It will take some time for WordPress to install the plugins. The page will be refreshed once the process is completed. You will need to click “Return to Required Plugins Installer”.
Here you will need to check all the plugins, choose “Activate” in a dropdown and click “Apply”.
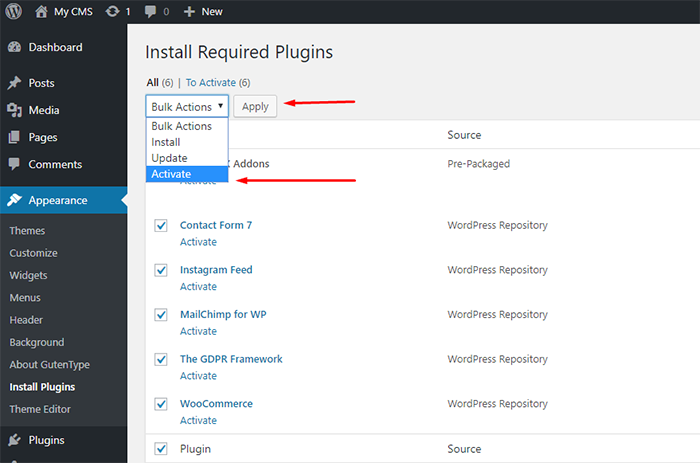
This process also may take some time. When all required and recommended plugins are installed you can proceed with dummy data installation. Different themes may have different dummy data installation ways. But in most of the cases it’s: Appearance – Install Dummy Data.
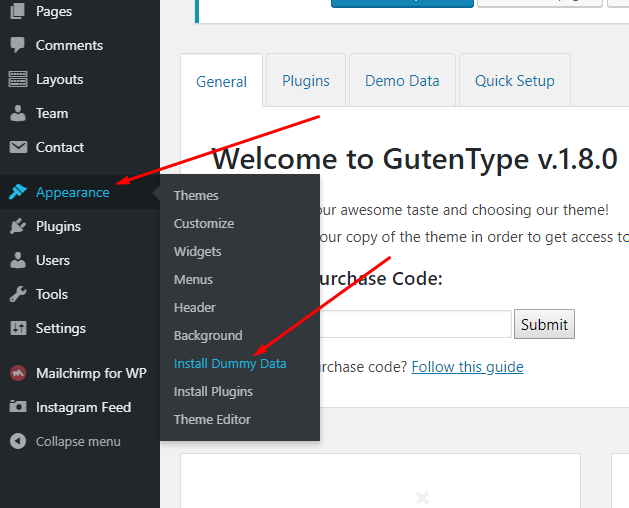
Demo content installation requires some time as well, so be patient while it is loading on your server. Usually it takes no longer than 2-4 minutes. Once the import process is finished you will get an exact copy of the theme demo on your site.
Step 5. Must Have WordPress Plugins
Most required plugins will be uploaded by your theme during the theme installation. However, there are some “must have” plugins you need to install, if they were not installed by the theme. Here is the list with the essential free WordPress plugins.
- UpdraftPlus. No matter whether you are a beginner or an experienced WordPress user, your site needs to have a backup. There are can be different situations like your hosting / server may suddenly crash, some of your files / databases may be accidently deleted or moved. UpdraftPlus gives an option to make a full backup of your site. Moreover, it can store a copy on a remote storage. It’s great, especially of your server goes down.
- Yoast SEO. Certainly, you want your site to be seen by Google, Yahoo and be on their 1st pages. Yoast SEO helps you to optimize your metadata and site content in most effective way. This plugin has both free and premium version. But free one is more than enough for the beginning.
- W3 Total Cache. Good site speed brings plenty of advantages. It positively influences your SEO and provides better user experience for your visitors. This plugin improves your site performance and reduces your page speed.
- Contact Form 7. When it comes to building contact forms on your site, the #1 choice is Contact Form 7 WP plugin. It helps to easily create any number of contact forms with any set of fields.
- Wordfence Security. Obviously, safety comes first. The plugin identifies and blocks malicious traffic, suspicious requests, protects from force attacks, scans site files (theme, plugins and core), repairs overwritten files and more. Also, Wordfence Security helps to set two-factor authentication, CAPTCHA, block attackers by IP, Host etc. The plugin has both free and premium versions. But even a free one is still quite powerful.
- Elementor. Elementor is an innovative page builder that has revamped how we build websites. Compared to other website builders that are hard to use and negatively affect website performance, Elementor has allowed users with little to no coding skills to take complete control over their websites and apply the needed changes to their layouts without extra help.
Elementor offers the best visual drag-and-drop editor in the market, allowing you to use ready-made blocks of content to create sections and web pages in the intuitive visual editor and watch the results of your work in real-time. Simply drag and drop the widgets and select pre-built templates, blocks, and pages you wish to be featured on your website. Moreover, Elementor allows you to create custom sections, which you can reuse across your projects.
Certainly, you may not need some of these plugins in your project if you use other plugins with similar functionality.
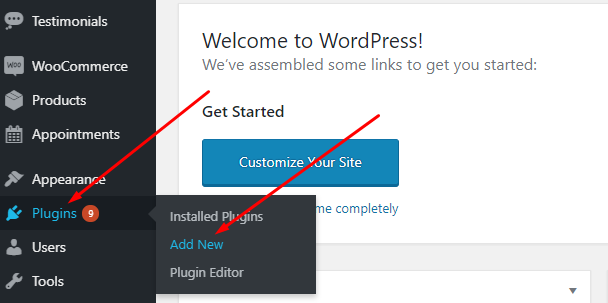
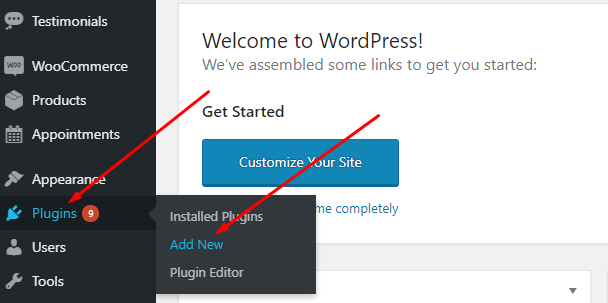
Let’s see how you can install these free plugins. In your WordPress dashboard navigate: Plugins – Add New.
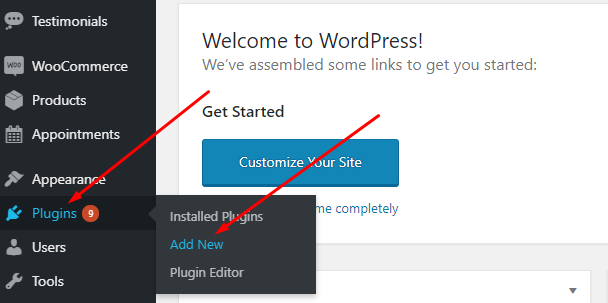
In a search field of new window type the plugin name and click “Install Now”.
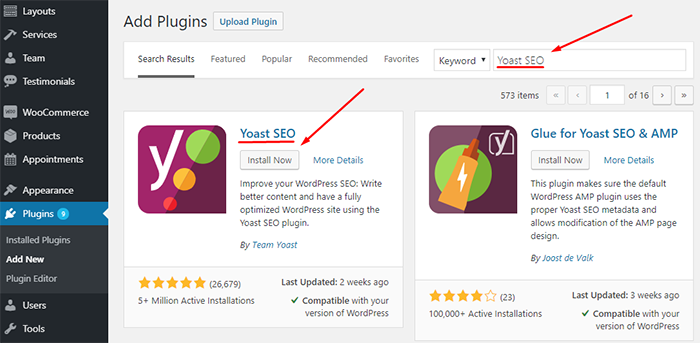
The Installation may take from 30 sec to 1 minute. Once the plugin is installed click “Activate”.
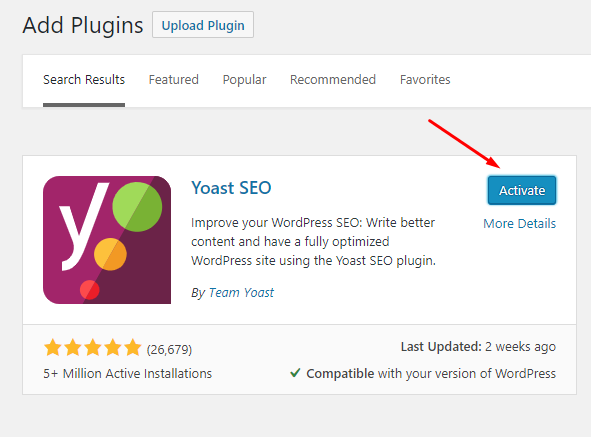
Great job! You’ve installed and activated your plugin and you can start working with it.
Step 6. Customize Your WordPress Site
When you installed your WordPress theme, plugins and imported demo data, you can proceed with a customization.
This stage requires some time and patience. If you want to save your time you can order a professional customization from our Custom Studio Team.
Always start with what the theme offers you. Most of the theme authors provide, what we call, “Theme Panel” or “Theme Options”. It’s a place, where you can control main options of your theme. For example, logo, title, general settings, color schemes, header & footer settings, layout, etc.
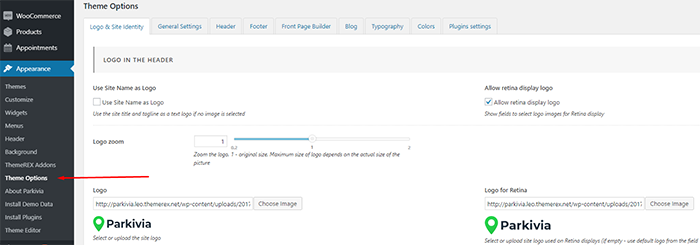
Most of our themes have the theme options panel. So, make sure to start your customization from there.
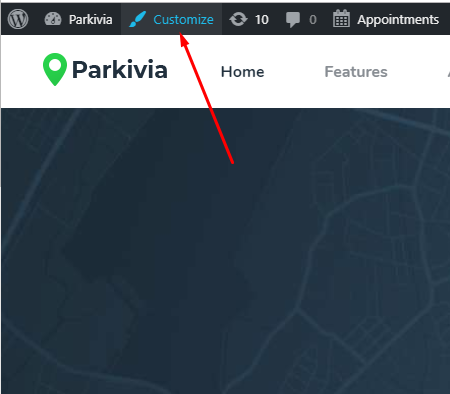
The next step is a WordPress Customizer. You can find a link on the top bar of your screen.
On the left side of your screen you will see available settings.
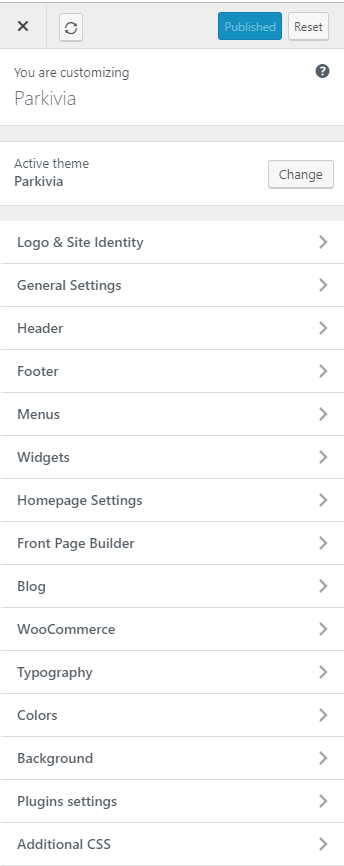
Go through them one-by-one to see what else you can customize. Sometimes you don’t need these options immediately, but may need in a future.
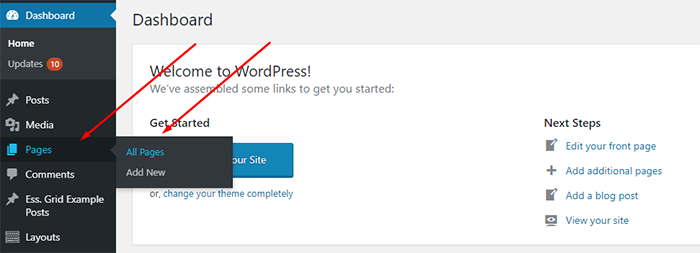
The next step is managing your site content. If you’ve imported the entire dummy data, go to your WordPress dashboard and navigate: Pages – All pages.
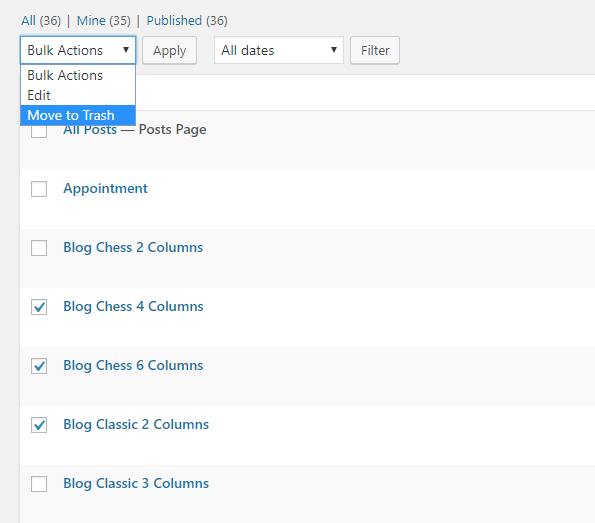
In a new window pick the pages you’d like to delete, in “bulk actions” drop down menu choose “Move to Trash” and click “Apply”.
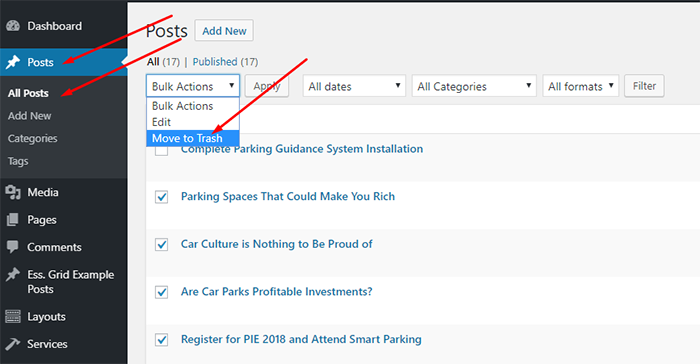
Do the same with blog posts. Navigate: Posts – All Posts. Then, pick the articles you don’t need and delete them.
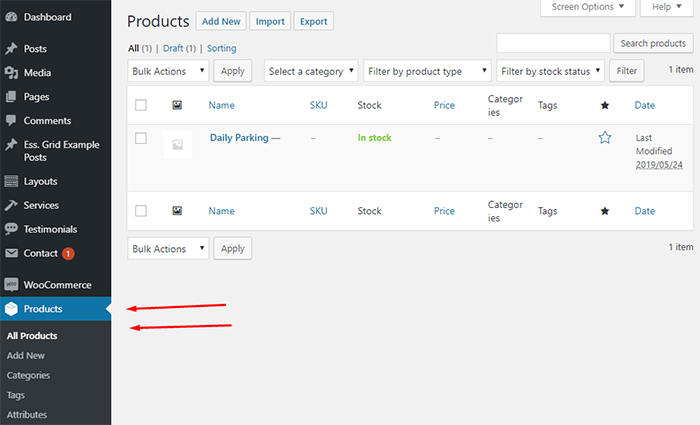
If your theme goes with WooCommerce store, you can do the same with the products. Navigate: Products – All Products and delete those you don’t need.
Next step is setting up your site menu. Navigate Appearance – Menus.
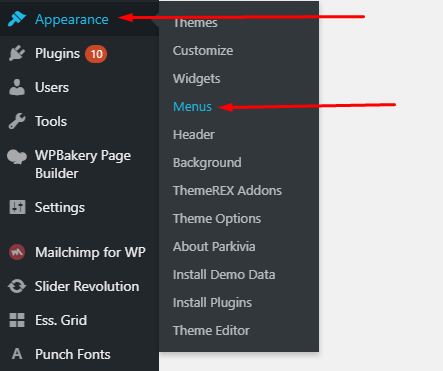
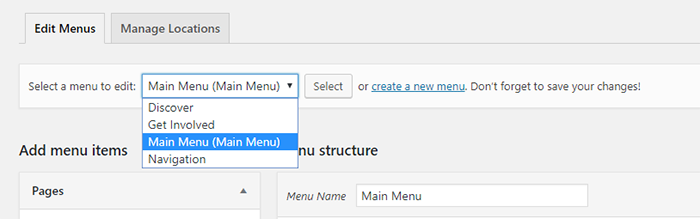
Please note, your theme may have multiple menus, so choose the one you need to modify and set which one is your main menu.
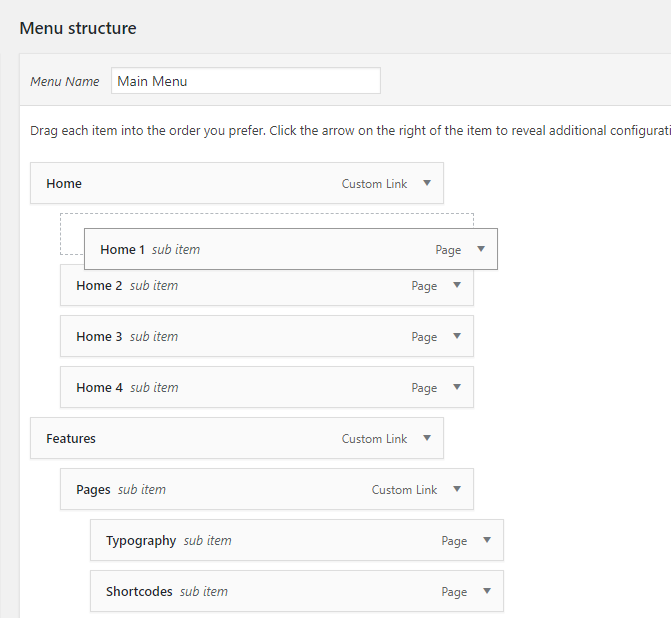
You can drag-n-drop menu options to change the structure and hierarchy.
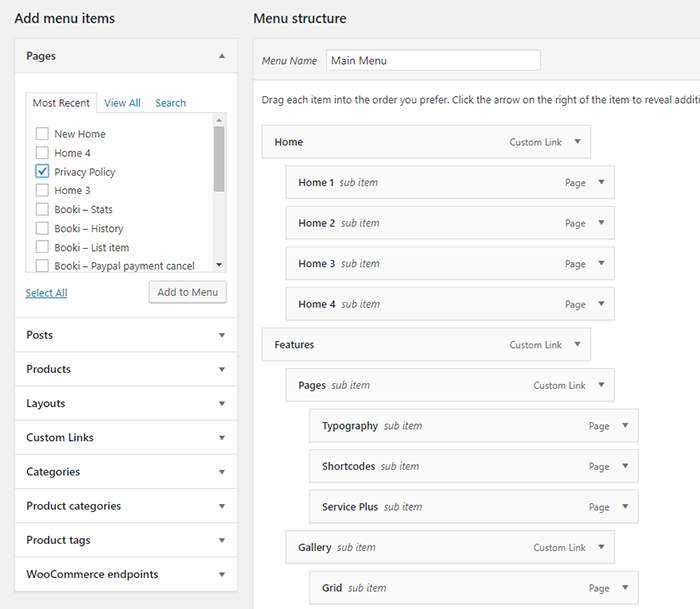
Also, you can add new menu items on the left side of the screen. Choose the item type, check the box and press “add to Menu”.
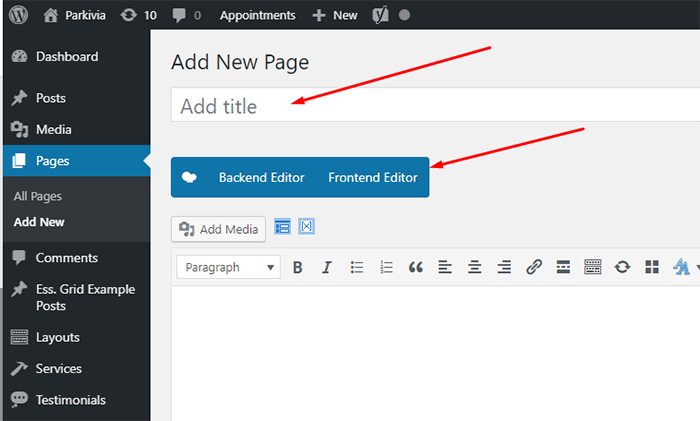
If you need to create a new page, navigate in your dashboard: Pages – Add New.
If your theme is equipped with WPBakery (previously known as a Visual Composer) on the next screen fill in the page title and click “Frontend Editor”.
Then, you will see a new page with a WPBakery frontend editor enabled.
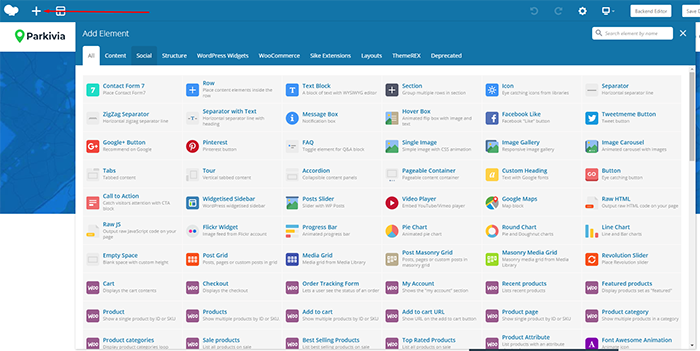
Click “+” button to see the available shortcodes that you can use on a page.
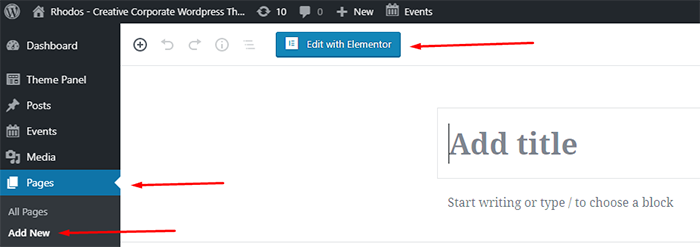
However, if your theme goes with Elementor Page Builder, navigate: Pages – Add New.
And on a new screen click “Edit with Elementor”.
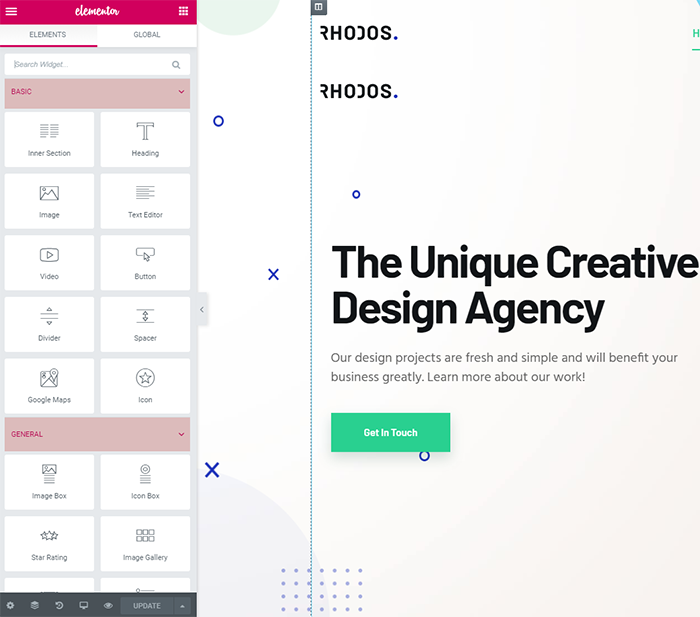
You will see a new page with the Elementor Dashboard on the left side.
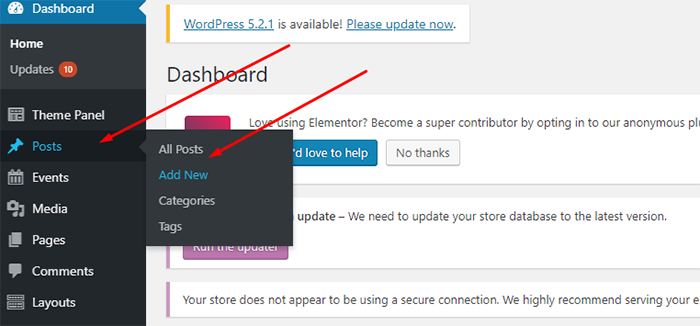
If you want to create a new blog post, navigate: Posts – Add New. And repeat the previously described step depending on the page builder you got.
Another great example of setting up an Agency site based on Eject Creative WordPress Theme.
Before publishing your pages and posts make sure your content is well optimized by search engines. As it was mentioned, the easiest way to do that is to install Yoast SEO Plugin. It automatically adds it’s panel on every post and page of your site.
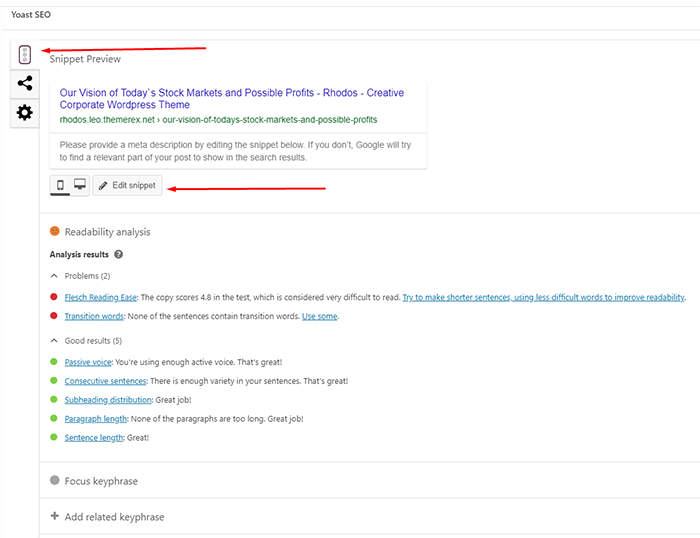
You will be able to manage: meta title, meta description, keywords. Also, it helps you to arrange your content properly. It will reveal and highlight any imperfections. Above all, you can manage whether to allow Google to index your pages and set metadata for social media. Additionally, you can get guidance from Light Tableau consultants to analyze any type of data.
A bonus tip regarding optimization of your site is to start implementing link building strategies from the early stage of your website growth, link building is an essential part of your organic growth and it can improve your metrics rapidly and keep them high for a long time.
Also, Yoast SEO has its own menu in your WordPress dashboard.
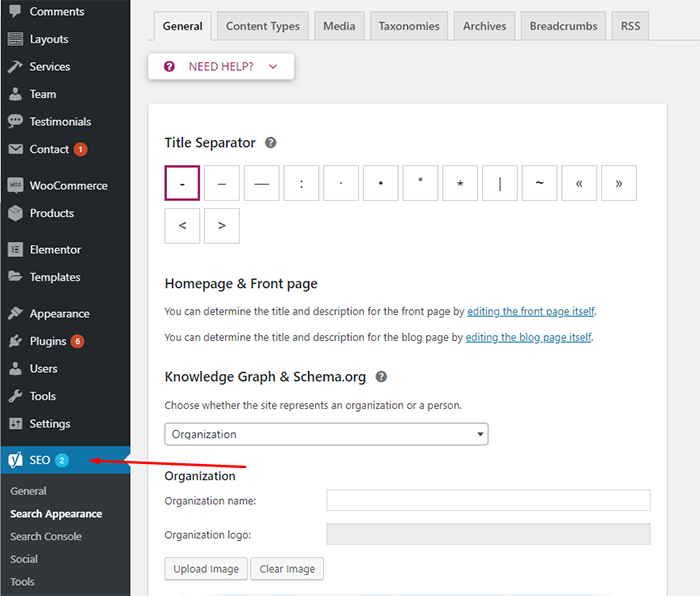
It’s also strongly recommended to go through the settings and set suitable options and macroses.
Step 7. Add Google Analytics
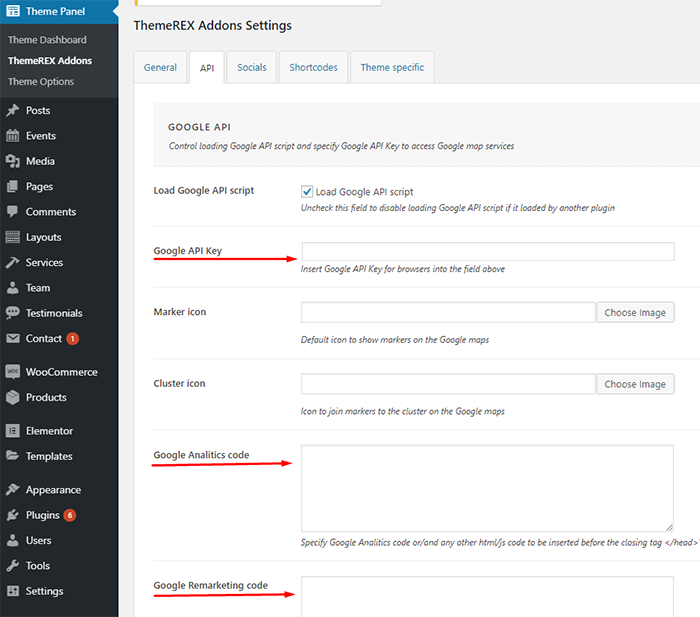
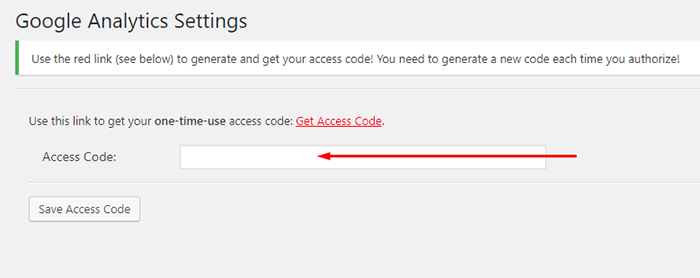
When your tracking code is set on your website, go ahead and check if it works with your GA account. You will just need to open any of your site pages and see whether your Google analytics shows active users.
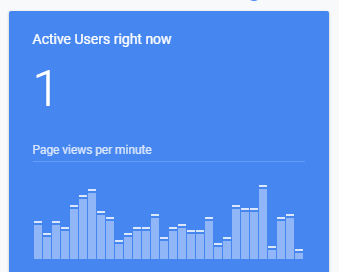
If you see yourself there the GA was set successfully.
In order to save your time, you always can order any part of website development from our Custom Web Studio. They can do everything starting with WordPress installation services and ending with turnkey website development. So, you may delegate the job to professionals and concentrate on what you really like to do.