
Moving your WordPress site to a new domain can prove to be quite stressful if not done appropriately. It may result in unexpected errors which can be annoying if not managed well. If all the steps of configuration are followed correctly, then the entire experience should be a breeze.
There are numerous ways in which one can approach this migration. The manual approach is not one of the easiest but is a great approach once you have a better understanding of it.
If you spend some time preparing your website for migration, then it is not something that you should be concerned about much. Here are some steps that you need to follow in order to move your WordPress site to a new host.
12 Simple Steps to Configure Your WordPress Site to a New Domain
Step 1: Deactivate All Plugins
Before you initiate configuring your WordPress site, it is recommended that you deactivate all your plugins. This is because once you start moving your WordPress site to a new domain, your plugins are most likely to fail.
Although WordPress has been designed to adapt to modifications, the plugins may not be. Therefore, it is vital to deactivate all plugins. For this, you need to go to the admin page and follow these simple steps.
Plugins – Installed Plugins – Mark All – Bulk Action – Deactivate – Apply
Step 2: Take a Backup of Your WordPress Database & Files
It is always a good practice to take a backup of your website before making any modifications. Although there are plugins for taking a backup, it would be best to adopt a manual approach. This will let you be in complete control of the entire process.
In order to backup manually, you need to login to phpMyAdmin and then click on your WordPress database. You should then Export the data for taking a backup of your work.
Step 3: Clean Up Your New Domain
If you have purchased a new domain that has never been registered before, then you can skip this step. If you have purchased a site and would like to redirect it to another domain, then you need to first check how healthy the new domain is.
It is vital to ensure that you are not carrying any penalties forward, which would prove detrimental to your SEO efforts. You should always check your new domain using Google Webmasters Tools.
All you need to do is add your new domain to the tool and check the Manual Actions Page. You can proceed if no issues have been noted. You will have to make necessary amendments if there are manual actions.
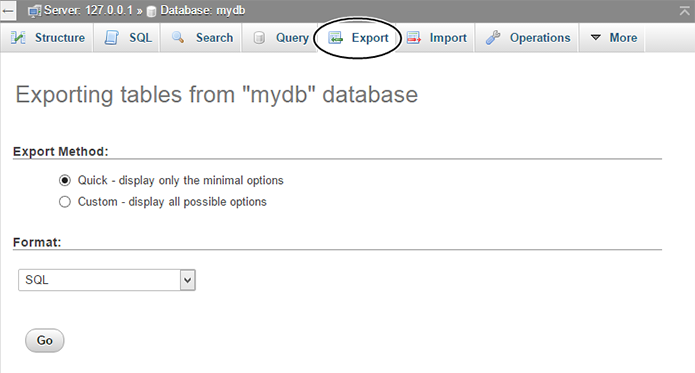
Step 4: Exporting WordPress Database

This is a simple process and can be accomplished in a few steps.
- Login to the cPanel account of your server and access phpMyAdmin application
- Select the database that consists of your WordPress installation from the list that you can find on the left-hand side
- Click on the Export tab after selecting from the navigation menu.
- Click on Go button to initiate exporting
Once the FTP transfer and database export of your files have been completed, you can proceed to the next stage.
Step 5: Edit Wp-config.php File
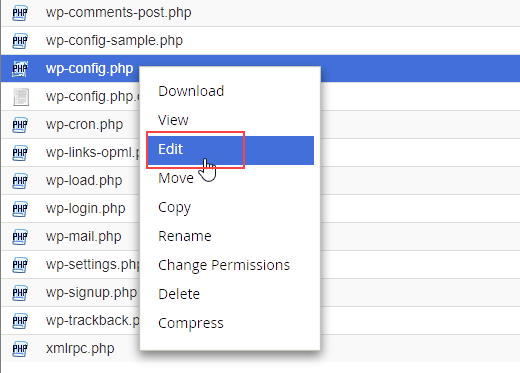
You can find this configuration in your local computer where you downloaded all the website files. The folder titled wp-config.php has control over your database and WordPress.
You need to have a copy of this file on your local computer as well. This is vital for restoring changes if anything goes wrong at a later stage.
You can open the original version of this file with a text editor and change the database name, database username, and also the user password.
Step 6: Upload WordPress Files to Your New Host
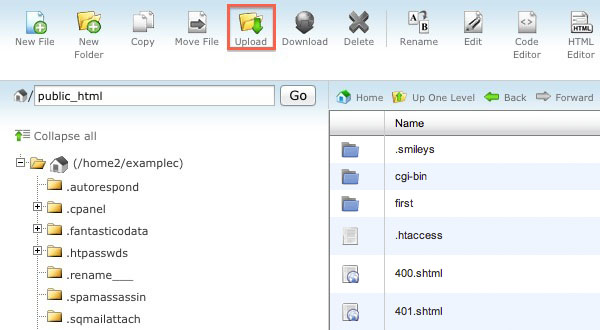
Once you are done with preparing the new database, you need to link your new web host utilizing the FTP program. If this is the primary site being installed on a new web server, then you need to upload the files to the public_html folder.
After selecting the remote directory, you can start uploading your website files which include the updated version of wp-config.php. This process can actually consume some time.
Step 7: Fix All Broken Links
Once you have moved your WordPress site to a new domain, you will likely find a couple of links broken within your content. Links to internal pages with the old domain can result in a bad user experience as it may return 404 error.
You may also inherit broken links from your old site if you have not fixed any of them while redirecting. You need to consider updating as many incoming links you can. You need to change your link on your social media and should reach out to all the owners who have been linking pages to your website.
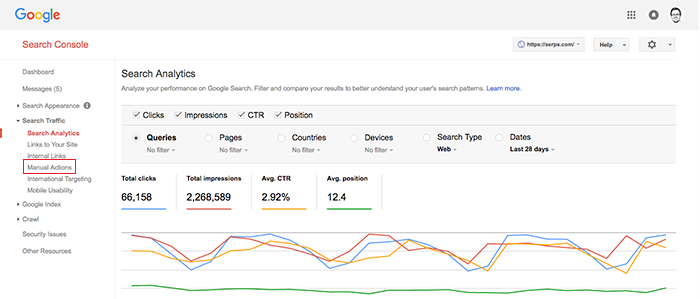
Step 8: Notifying Google
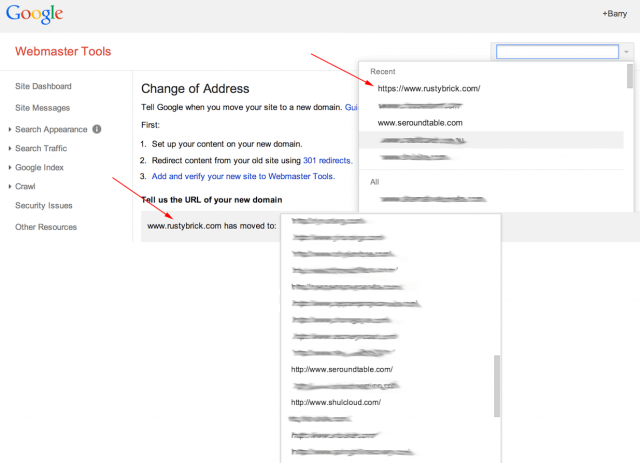
If you want Google to start indexing your domain as soon as possible, then you need to make sure to notify it. You need to utilize the Change of Address Tool which can be found within the Google Search Console. The following steps will help you accomplish this task.
- Click on your old site in Google Search Console
- Click on the gear icon present on the top right side
- Select the change of address option from the drop-down menu for accessing the page
- Follow the steps and hit the submit button
Step 9: Submit the New Sitemap to Google
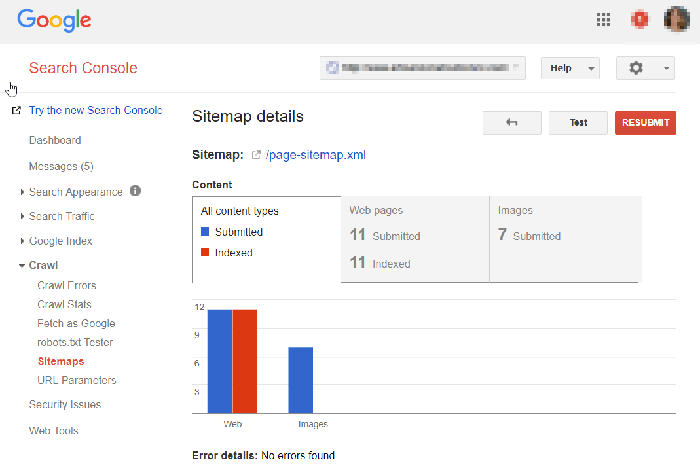
While moving your domain successfully, you need to submit your new sitemap to Google. It should consist of clear detailing about various URLs you are using in your content.
Search engines utilize sitemaps for indexing purposes. You can utilize WordPress plugins for generating a sitemap in no time. Adding a sitemap to Google Search Console (GSC) is quite easy. You just need to access your new site in GSC and then navigate to Crawl– Sitemaps for making necessary changes.
Step 10: Clean Cache and Refresh the Browser
Cleaning cache is a crucial step and should not be neglected as it can solve several unwanted issues. All you need to do is clean your cache and then refresh your browser. Then, you should need to visit your new domain homepage.
Step 11: Redirect Your Old Domain to the New One
In this step, you need to set up a permanent 301 redirect to your website. This will help with both SEO and user experience. The users who land on your old website from the search engine can easily navigate to your new website if you implement this step.
- Log into your cPanel
- Click on the file manager
- Open your websites folder
- Locate .htacess file and edit
Step 12: Change the Domain in Google Analytics
If you fail to implement this step, then it can impact your SEO efforts in a significant way. Google Analytics offers you an insight on how to improve your SEO at any given time. Making changes is quite simple.
- Login to Google Analytics
- Click on Admin tab
- Choose Property Settings
- Enter your domain name in the URL field
- Hit Save
Conclusion

Moving your WordPress site without hurting your SEO is not an easy task. However, it is doable if you follow all the steps associated with the configuration appropriately.
Always plan ahead and create backups. You need to be 100 percent sure if the move is necessary. Do not forget to notify your visitors well in advance. You can create a blog post or use a pop up for reminding your visitors/subscribers.
Try to maintain a similar URL structure as on the old website. You need to remember that you will need some time to recover your SEO rankings after implementing the switch. Market it as much as you can to boost your SEO rankings.