
Are you planning to build an e-commerce WordPress website for your brand? That’s a smart decision as WordPress is a robust and scalable platform that is available for free. But it’s not for everyone as it is time-consuming and unnecessary for selling a few products.
If you are determined to use WordPress for your website, check out the guide below.
Follow these steps to build and launch your e-commerce WordPress website successfully:
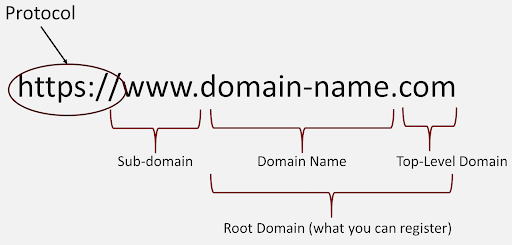
Secure a Domain Name and a web Hosting Provider
A domain name (i.e., the part after ‘www’ in your URL) is your e-commerce web site’s unique address. To buy a domain name, visit websites like NameCheap. You may find the option you like for free and then sell it at a low price ranging from $10 to $20/year.
The domain you want can be unavailable/available via resale at a much higher price by hundreds/thousands of dollars in the first year. Even the most expensive domain names renew at a standard rate ($10 to $20/year) after that.
Pick a short domain name that goes well with your brand name.
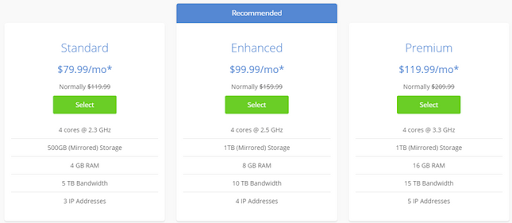
After that, you need to find a good web hosting for ecommerce websites.
Without a hosting provider, your website can’t grow. When choosing the right hosting provider and type of hosting, you need to think about the type of online store you want to build. You can also create a new email account with the same name.
It is advisable to skip shared hosting as when you share a server with other websites, your eCommerce website gets vulnerable if one of them gets hacked. Don’t share your hosting if you deal with people’s credit card details.
Bluehost is a popular WordPress hosting provider which automates a lot. If you are just starting with selling a few products and want your business to grow exceptionally shortly, go for Bluehost’s WooCommerce hosting plans.
Bluehost, which starts at $12.95/month eases the accessibility of e-commerce WordPress websites. The single-click payment processing automatically installs storefront themes that help you to sell limitless products.
Install WordPress and get an eCommerce Plugin
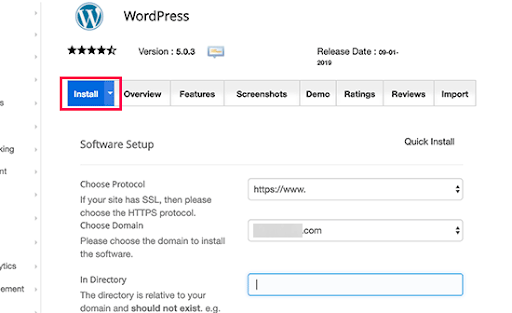
You can install WordPress in two ways: one click and manual WordPress installation.
As one-click WordPress installation is the easiest, you should go for it with no second thoughts. Look for a hosting provider that offers the benefit of «one-click» installation in the list of top WordPress hosts. Once you sign up with such a hosting provider, visit a hosting dashboard and click on a button saying – «Install WordPress».
Manual WordPress installation is mainly about downloading WordPress to your computer and then uploading it to your hosting dashboard.
WooCommerce is an open-source platform created by a community. You can convert your website into an online store without investing money. But you need to pay for extensions below:
- Product pages
- Shipping options
- Label printing
- Checkout
- Secure payments
- Automated tax calculations
- Integration with Facebook and Google Analytics
Sign in to your WordPress dashboard and click » Plugin» on the left-hand menu to access the plugin directory. Search for «WooCommerce» in the search bar and then click the “Install Now» button.
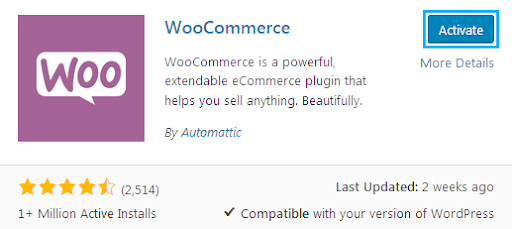
Then search for WooCommerce in the theme directory. You can see this turns to a blue-colored one after a few moments that shows the text «Activate»(see the image above). Click on it. Take the help of WooCommerce’s setup wizard to easily complete the installation process.
Select a WordPress Theme
The theme is the main design for all your website content. WordPress allows you to fully customize your e-commerce website through editing or HTML coding. If you are not a coding expert, select a theme that looks almost similar to your desired eCommerce website.
Choose a theme that works perfectly for your e-commerce website even if that requires you to buy a premium template from a third-party website.
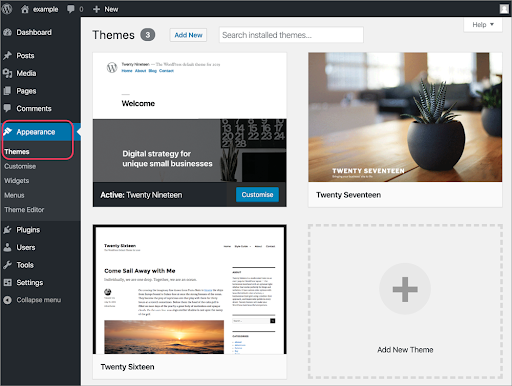
In the theme directory, you get a collection of free WordPress themes that you can access via the dashboard. Sign in to your WordPress dashboard, hover on » Appearance» and then click «Themes» which takes you to the theme dashboard(refer to the image below).

Click the button above themes that show «Add New» and then browse themes below sections such as «Popular» and «Features». You can also use the search bar to look for specific industries.
Demo a couple of themes to find the option you like and then click » Install» below the theme to download it. A button appears below the theme after a few minutes that shows «Activate». Once you click this button, you install this theme for your e-commerce website.
Add the Products
As you are building an e-commerce website, you need to add products to the website that you want to sell. To do so, go to »Products» down the left-hand side and «Add New».
You need the following things to add new products to your e-commerce WordPress website:
- Product name
- Cement plant pot
- Prive
- Main and additional product images
- Product description
- Product category
The ways you add products with WooCommerce depends on the kind of products you add such as – Simple, Grouped, External/Affiliate, Variable, Downloadable and Virtual.
You have to click through all the tabs to add all the important details regarding your products. Take a look at what every tab of the «product data» section covers:
- General – price and tax
- Shipping – shipping cost and product dimensions
- Inventory – place to add SKUs and other things if you want to track inventory
- Attributes – place to add different versions of a variable product
- Linked products – update with related products to upsell
When you are satisfied with your product, click the blue «Publish» button towards the top on the right side.
Install More Plugins
Besides WooCommerce, you can install the plugins below for your e-commerce website:
- Securi for Security
The security stakes are quite higher if you deal with card payments on your e-commerce website. You can get free security plugins like Wordfence, but paying a little amount for it can be a great decision. Securi plans cost $199/year but you need to install a free plugin from the WordPress directory to activate it.
- Yoast SEO
If your online store is not visible on SERPs, the existence of your website doesn’t make sense. Yoast SEO is a plugin that helps you to boost your SEO and search engine rankings.
- Site Reviews
Social proof is a factor that influences users to buy your products. Once you install Site Reviews, this plugin helps your customers to post reviews on your e-commerce website.
It’s quite easy to add plugins to your website. You need to log in to your WordPress dashboard, go to «Plugins» and then ‘Add New’. Access the search bar on the top right-hand side to look for specific plugins or general features. When you find your desired option, check its ratings and reviews to understand if it is reliable and then click the «Install Now» button.
After WordPress finishes the plugin download, you get a message that prompts you to click «Activate Plugin». Then access settings to configure the plugin by following the instructions in the plugin description.
Add Content to Your Site
To add and edit the content on the key pages of your website, go to » Pages» and then «All Pages».
Work on the elements below to perfectly add content to your e-commerce website:
- Microcopy
Microcopy, also called » UX copy» refers to navigational copy, CTAs, and error messages on your website. It is the most crucial copy on your website as it guides users via your website and persuades/reassures them at the main points.
So, write your microcopy carefully by considering users’ mindset at every step of their journey on your website.
- Product Images
The overall appearance of your online store depends a lot on the product images you use. Pick a high-quality camera and clear background so your product pages look great. Use images that do well with the product features and descriptions.
To compress your image sizes without compromising the quality, use a tool like Kraken. The size compression speeds up your web pages.
- Product Descriptions
Make sure your product descriptions are short considering the things you would like to know that are not visible in images. Add bullet points to categorize your product details. Maintain consistency in information and formatting.
- Privacy Policy
WordPress asks you to choose a privacy policy page before launching your website. You can choose an available handy template by visiting «Settings», then «Privacy» and click «Check out our guide». After that select the right page from the drop-down menu below.
Launch the Site
Preview pages to see how they would look live. When you are happy with the way your website looks or functions, make it public. You’ll need to continuously create fresh content.
You should also create a realistic business development plan for your company. That includes an effective guest blogging strategy to make your content rank.
Bottomline
So, now you know the steps to successfully launch a WordPress website. Let’s recap them below:
- Secure a domain name and a web hosting provider
- Install WordPress and get an eCommerce plug-in
- Select a theme
- Add the products
- Install more plug-ins
- Add content to your site
- Launch the site
Hopefully, this simple guide helped you. But remember that WordPress is perfect for developers with some technical expertise. Though e-commerce website builders are user-friendly and their prices start at only $15/month.